


Whether you are upgrading to the revolutionary macOS 26 (Tahoe), fixing a sluggish system, or preparing your MacBook for sale, knowing how to install macOS correctly is a fundamental skill for every Apple user.
- Before You Start: Essential Prerequisites
- Method 1: The Standard Update (Easiest Way)
- Method 2: How to Reinstall macOS via Recovery Mode
- Method 3: How to Clean Install macOS (The “Fresh Start”)
- Method 4: Install via Bootable USB (Advanced)
- Troubleshooting Common Installation Errors
- Post-Installation Checklist
- Frequently Asked Questions (FAQ)
While the process has become more streamlined with the advent of Apple Silicon (M1 through M5 chips), the distinction between a simple “Update” and a “Clean Install” often confuses users. A wrong step can lead to data loss or a “brick” situation.
In this comprehensive guide, we will walk you through every method to install, reinstall, or clean install macOS using Recovery Mode, a bootable USB drive, and Internet Recovery.!
Before You Start: Essential Prerequisites
Before you attempt to wipe your drive or update, you must ensure your machine is ready. Skipping these steps is the #1 cause of installation failures.

1. Check Compatibility
Can your Mac run the latest software? macOS 26 (Tahoe) requires the neural engine found in newer chips for features like “Liquid Glass” and Apple Intelligence.
| Mac Model | Supported Chips |
| MacBook Air | M2, M3, M5 |
| MacBook Pro | M1 Pro/Max, M2, M3, M4, M5 |
| iMac | M1, M3, M5 |
| Mac Studio/Pro | M1 Max/Ultra and later |
WiTechPedia Note: If you have an older Intel Mac (2019 or earlier), you may be limited to macOS Sequoia.

2. The “Golden Rule”: Back Up First
Warning: A “Clean Install” will erase everything on your hard drive. Even if you are just reinstalling, accidents happen.
- Time Machine: The easiest method. Plug in an external drive and let macOS back up your entire system.
- iCloud Drive: Ensure your Desktop and Documents folders are synced.
3. Free Up Space (The 50GB Rule)
Modern installers are massive. The macOS Tahoe installer is approximately 14GB, but it requires at least 45-50GB of free space to unpack and run scripts effectively.
Method 1: The Standard Update (Easiest Way)
Best for: Users who just want the latest features without losing data.
If your Mac is running fine and you simply want to upgrade to the newest version:
- Open System Settings (Apple Menu > System Settings).
- Navigate to General > Software Update.
- Wait for the system to refresh. You should see “macOS Tahoe 26.0 Available.”
- Click Upgrade Now.
Method 2: How to Reinstall macOS via Recovery Mode
Best for: Fixing a corrupted system or buggy software while keeping your files intact.
Recovery Mode is a special partition on your drive that allows you to reinstall the OS without booting into it. The method differs significantly depending on your processor.
For Apple Silicon Macs (M1, M2, M3, M5)
- Shut down your Mac completely.
- Press and hold the Power button (Touch ID).
- Keep holding until you see the “Loading startup options” screen.
- Select Options (the gear icon) and click Continue.
- Enter your admin password if prompted.
- Select Reinstall macOS Tahoe from the menu and follow the on-screen prompts.

For Intel-Based Macs
- Restart your Mac.
- Immediately hold down one of the following key combinations until you see the Apple logo:
- Command (⌘) + R: Reinstalls the version currently installed on your Mac.
- Option + Command (⌘) + R: Upgrades to the latest compatible macOS version.
- Select Reinstall macOS from the Utilities window.
Method 3: How to Clean Install macOS (The “Fresh Start”)
Best for: Selling your Mac, removing stubborn malware, or getting that “new computer” speed.
A clean install involves erasing your hard drive completely before installing the OS.
Step 1: Enter Recovery Mode
Follow the steps in Method 2 above to get to the Utilities screen.
Step 2: Wipe the Drive with Disk Utility
- Select Disk Utility from the menu.
- Click View > Show All Devices (Crucial Step!).
- Select the top-level drive (usually named “Apple SSD” or “Macintosh HD”).
- Click Erase in the toolbar.
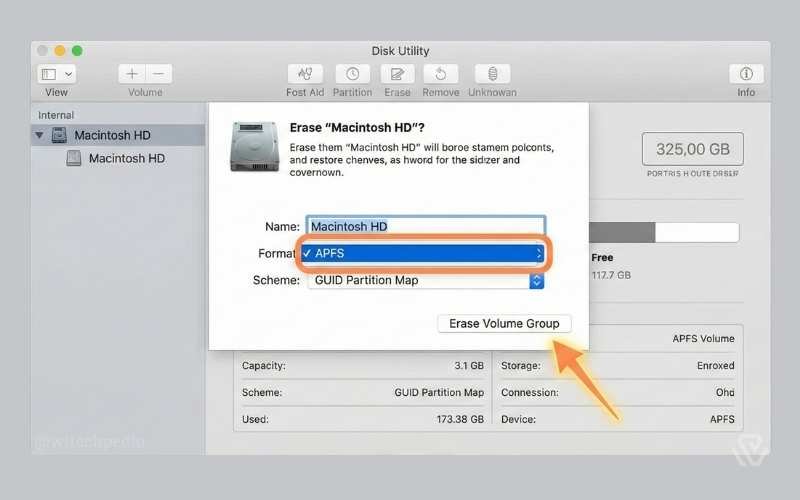
- Configure the format settings exactly as follows:
- Name:
Macintosh HD - Format: APFS (Apple File System). Do not use Mac OS Extended.
- Scheme: GUID Partition Map.
- Name:
- Click Erase Volume Group. Once finished, quit Disk Utility.
Step 3: Run the Installer
Back at the main menu, select Install macOS Tahoe. Select your newly erased Macintosh HD as the destination. Your Mac will now be factory fresh.
Method 4: Install via Bootable USB (Advanced)
Best for: IT admins, installing on multiple Macs, or if Recovery Mode is broken.
To install macOS from USB, you need a flash drive (16GB+) and the Terminal app.!
1. Prepare the USB Drive
Plug in your USB drive and name it MyVolume.
2. Download the Installer
Download the macOS Tahoe installer from the App Store. Once it opens, quit the installer immediately (Command + Q) so it stays in your /Applications folder.
3. The Terminal Command
Open Terminal and paste the following command (specific for macOS 26 Tahoe):
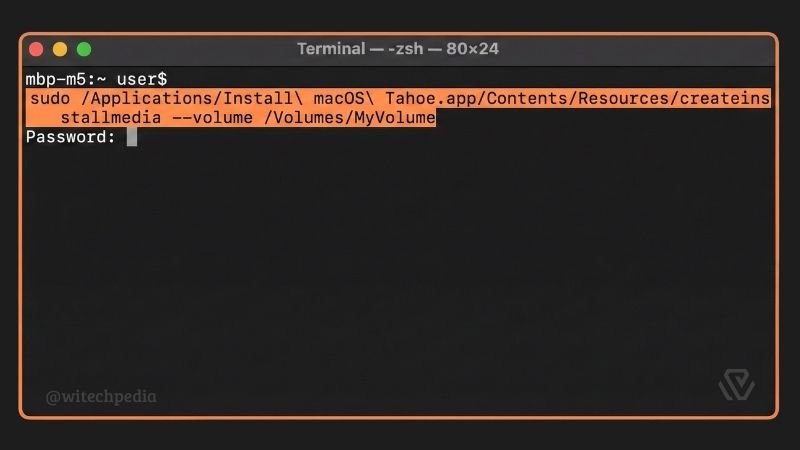
Bash
sudo /Applications/Install\ macOS\ Tahoe.app/Contents/Resources/createinstallmedia --volume /Volumes/MyVolume
Press Enter, type your password, and wait for the process to complete.
4. Boot from USB
- Silicon: Shut down. Hold Power button. Select the Install macOS Tahoe disk icon.
- Intel: Restart. Hold the Option (Alt) key. Select the yellow USB disk icon.
Troubleshooting Common Installation Errors
Even pros encounter errors. Here are the fixes for 2026’s most common issues.
“An Error Occurred While Preparing the Installation”
This is often caused by incorrect system dates.
- Fix: Open Terminal in Recovery Mode and type
date. If it’s wrong, update it usingdate [mm][dd][HH][MM][yy](e.g.,date 0216173026for Feb 16, 5:30 PM, 2026).
“Macintosh HD – Data” Volumes
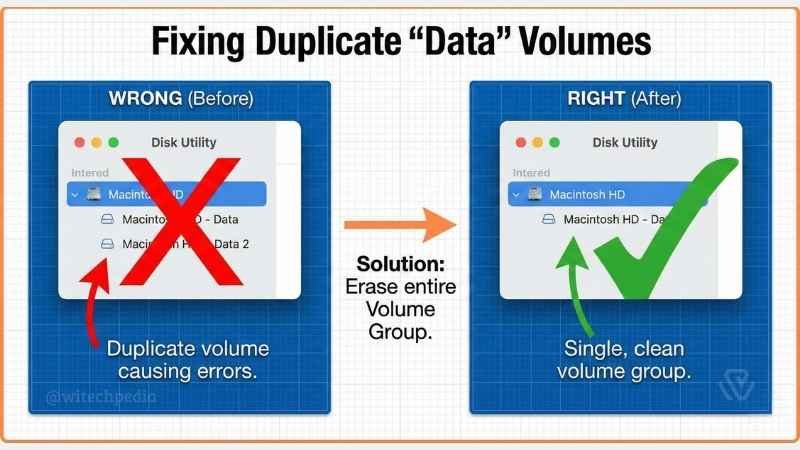
If you see two drives named “Macintosh HD” and “Macintosh HD – Data” in Disk Utility, you didn’t erase the volume group properly.
- Fix: Delete both volumes and create a single new APFS volume named
Macintosh HD.
Wi-Fi Not Working in Recovery
- Fix: Click the Wi-Fi icon in the top right corner. If it fails, try connecting an Ethernet cable via a USB-C dongle.
Post-Installation Checklist
Congratulations! You have successfully installed macOS. Here is what to do next:
- Run Software Update: Even a new install might have “Day 1” security patches.
- Enable FileVault: Go to System Settings > Privacy & Security to encrypt your disk.
- Activate Apple Intelligence: Navigate to the new “Intelligence” tab to set up Siri 2.0 and local LLM features.
Frequently Asked Questions (FAQ)
How long does it take to install macOS Tahoe?
On an M5 MacBook Pro, a clean install takes about 25-35 minutes. On older Intel Macs, it can take up to 1 hour.
Can I downgrade macOS if I don’t like the new version?
Yes, but it requires a clean install. You cannot “downgrade” while keeping your files intact unless you restore from an old Time Machine backup. See our Guide to Downgrading macOS.
Do I need an internet connection for Recovery Mode?
Standard Recovery runs from a hidden partition and doesn’t strictly need internet. However, Internet Recovery (Option + Command + R) downloads the OS from Apple’s servers and requires a stable Wi-Fi connection.
Related Articles on WiTechPedia:
- Wiki: The History of macOS Versions
- Review: Is the M5 Chip Worth the Upgrade?
- Guide: How to Reset NVRAM/PRAM on Mac
Disclaimer: WiTechPedia is not affiliated with Apple Inc. macOS is a trademark of Apple Inc. Always back up your data before performing system operations.