
You want to install macOS on your Mac. This comprehensive guide shows you exactly how to install macOS Tahoe — the latest version 26.4.1 as of April 2026 — using the safest and most effective methods. You follow these clear instructions and complete the installation successfully without data loss.
WiTechPedia delivers this expert tutorial so you avoid common pitfalls and enjoy a faster, more secure Mac. You learn multiple reliable approaches: simple software update, Recovery Mode reinstall, and full clean install with a bootable USB.
Why Install macOS Tahoe Now
macOS Tahoe 26.4.1 brings improved performance, enhanced security, a refined Liquid Glass interface, and powerful AI features. You gain better battery life, faster app launches, and stronger privacy protections. Apple releases these updates to fix vulnerabilities and optimise your hardware. You install the latest version today and keep your Mac running smoothly for years.

macOS Tahoe Compatibility
You verify compatibility before you begin. macOS Tahoe supports all Apple Silicon Macs from 2020 onward and a few specific Intel models.
Compatible models include:
| Mac Model | Supported Chips |
| MacBook Air | M2, M3, M5 |
| MacBook Pro | M1 Pro/Max, M2, M3, M4, M5 |
| iMac | M1, M3, M5 |
| Mac Studio/Pro | M1 Max/Ultra and later |
You visit Apple’s official compatibility page for the full list: macOS Tahoe Compatible Macs. If your Mac does not appear on the list, you explore our guide on macOS on Unsupported Macs.
Tools You Will Need
Preparation Steps (Must Do First)
You follow these quick steps first:
Important: Read our detailed backup guide first: How to Backup Your Mac Completely.
Method 1: Update macOS Tahoe via Software Update (Easiest)
You choose this method for a quick upgrade that keeps all your files and apps
This method usually takes 30–60 minutes. Your data stays completely safe. You compare options in our article: macOS Update vs Clean Install – Which Should You Choose?.

Method 2: Reinstall macOS Tahoe via Recovery Mode
You use this method when your Mac has issues or you want a fresh reinstall without erasing data.
For Apple Silicon Macs:
Related Articles

For Intel Macs:
The Mac restarts multiple times. Your personal files remain intact. Official reference: How to Reinstall macOS.
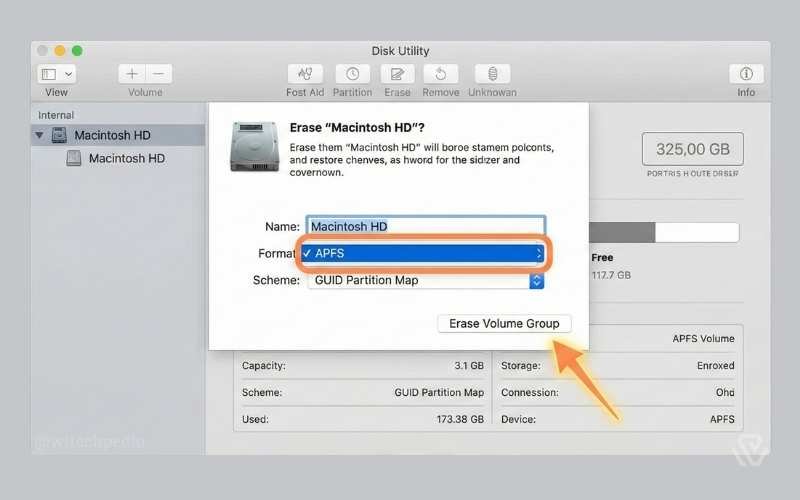
Method 3: Clean Install macOS Tahoe with Bootable USB (Recommended for Best Performance)
You select this method for a completely fresh system.
Step 1: Download the Full Installer
You open the App Store or use Terminal:
softwareupdate --fetch-full-installer --full-installer-version 26.4.1Step 2: Create Bootable USB Installer
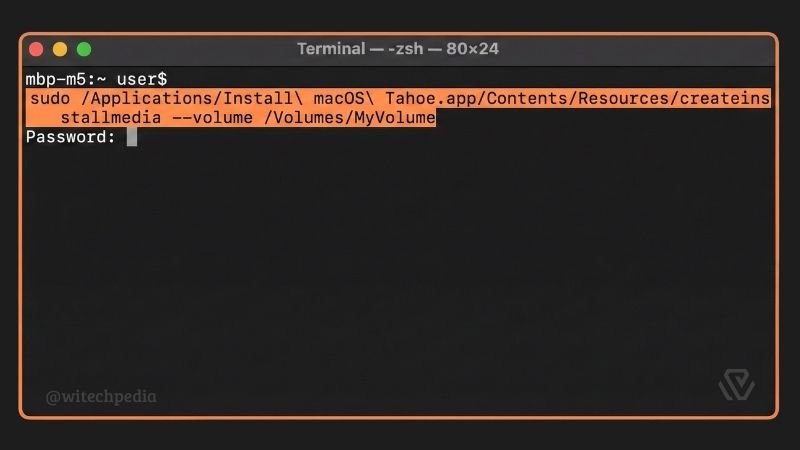
sudo /Applications/Install\ macOS\ Tahoe.app/Contents/Resources/createinstallmedia --volume /Volumes/MyVolumeOfficial Apple guide: Create a Bootable Installer for macOS.
Step 3: Perform the Clean Install
Warning: This step erases all data. You ensure you have a complete backup.
Troubleshooting Common macOS Installation Problems
You find advanced solutions in our guide: macOS Troubleshooting Guide.
Post-Installation Checklist
You complete these steps after installation:
Frequently Asked Questions (FAQ)
Will installing macOS Tahoe delete my files?
No. Software Update and Recovery Mode keep all your data. Only the clean install erases files if you manually format the drive.
How long does it take to install macOS Tahoe?
The process typically takes 45 to 90 minutes, depending on your Mac model and internet speed.
Can I install macOS Tahoe on an old Intel Mac?
Only specific 2019–2020 Intel models are supported. You check the compatibility list above.
What should I do if the update fails?
You restart in Recovery Mode and try reinstallation. You also consult our troubleshooting guide.
Is it safe to install the latest macOS version?
Yes. You always back up first. Apple thoroughly tests each release.
Can I downgrade after installing macOS Tahoe?
Yes, but the process is complex. You read our guide: How to Downgrade macOS.
Final Thoughts
You now possess a complete, expert-level understanding of how to install macOS Tahoe on any supported Mac. You follow the steps in this guide and enjoy improved speed, security, and new features.
Ready to take your Mac to the next level? You explore our guide on Best macOS Settings for Maximum Productivity.
If you encounter any issues, you leave a comment below with your Mac model and exact error message. The WiTechPedia team responds promptly.
You share this article with other Mac users and subscribe to WiTechPedia for more in-depth Apple tutorials and guides.


